Hiii ESP Lovers,
Most of you have heard about Internet of Things (IoT) & ESP 8266. It's everywhere. Everywhere? Yes, Everywhere.
What it is?
In this post, I am going to explain ESP 8266 - 01. Let's go on a quick ride.
Intro:
The ESP8266 is perhaps the most versatile serial module to connect "things" at the Internet, that why it is so popular in the world of IoT.
It is a complete module, which includes a microprocessor which can be programmed directly via the Arduino IDE (C++), or in other environments to build (usually using a high level language itself, the "LUA").
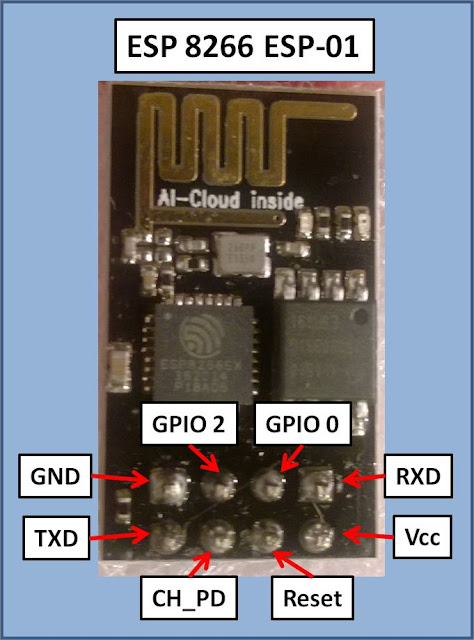
Have a look at ESP 8266 - 01
 To control "things" there is no need to have the Arduino or other microcontroller itself to the
interface because the ESP8266 has 2 GPIOs (two "pin" input / output).
To control "things" there is no need to have the Arduino or other microcontroller itself to the
interface because the ESP8266 has 2 GPIOs (two "pin" input / output).
Pin Description
Features
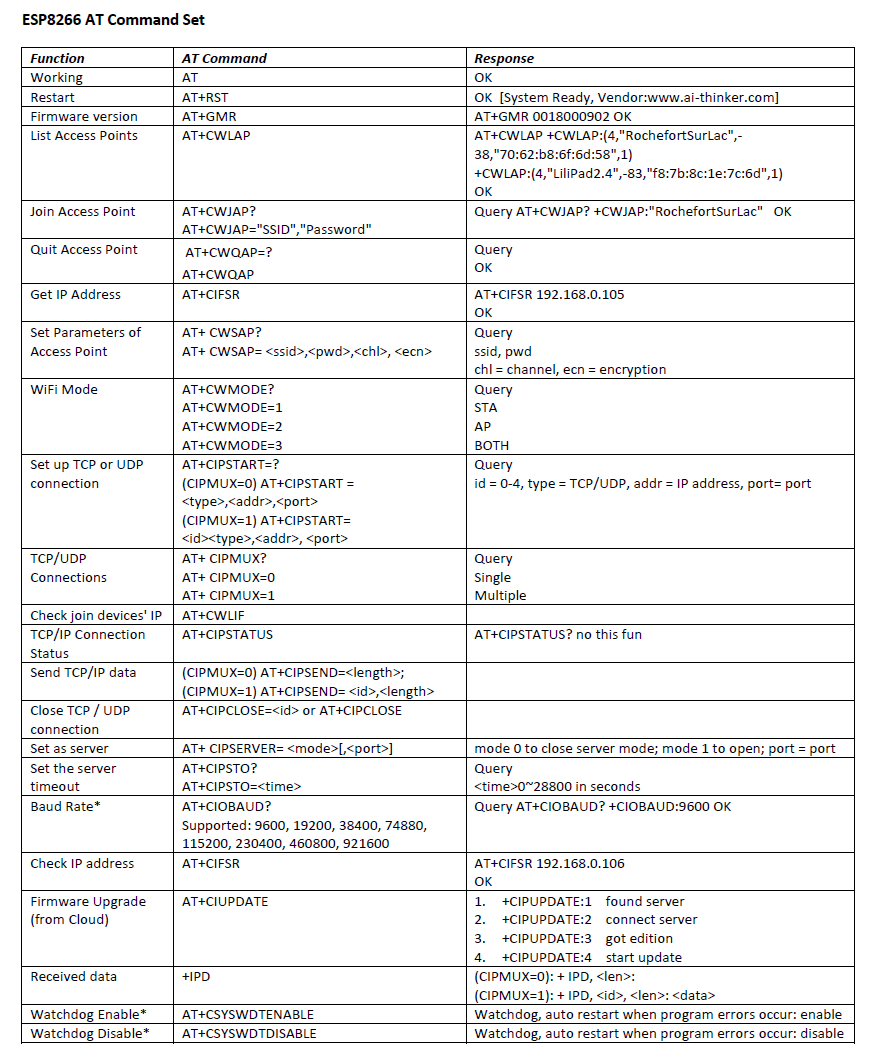
We'll cover AT Command test through arduino in our upcoming posts.
AT Commands

Applications:
ESP8266 can be used as an external Wifi module, using the standard AT Command set Firmware by connecting it to any microcontroller using the serial UART, or directly serve as a Wifi-enabled micro controller, by programming a new firmware using the provided SDK.
The GPIO pins allow Analog and Digital IO, plus PWM, SPI, I2C, etc.
This board has been used mostly in IoT contexts, where we want to add connectivity for example to an Arduino project. A wide adoption has been facilitated by the very modest price, ranging from 2.50 to 10 USD depending on the features offered by the manufacturers.
Some example projects:
Most of you have heard about Internet of Things (IoT) & ESP 8266. It's everywhere. Everywhere? Yes, Everywhere.
What it is?
In this post, I am going to explain ESP 8266 - 01. Let's go on a quick ride.
Intro:
The ESP8266 is perhaps the most versatile serial module to connect "things" at the Internet, that why it is so popular in the world of IoT.
It is a complete module, which includes a microprocessor which can be programmed directly via the Arduino IDE (C++), or in other environments to build (usually using a high level language itself, the "LUA").
Have a look at ESP 8266 - 01
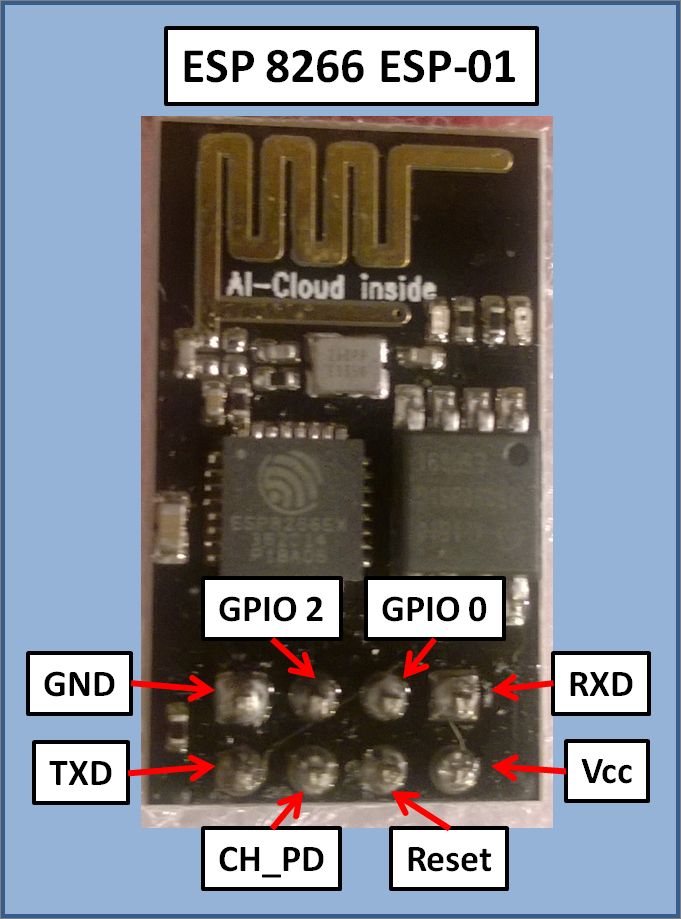
Pin Description
- VCC shall be connected to the 3.3V power supply
- GPIO0 and GPIO2 are general purpose digital ports. GPIO0 also controls the module mode (programming or normal operation).
- Rx: Receives Data (3.3 V logic Level)
- CH_PD: Chip enable. Keep it on high (3.3V) for normal operation
- RST: Reset. Keep it on high (3.3V) for normal operation. Put it on 0V to reset the chip.
- GND is ground.
- Tx: Transmits Data
Features
- 802.11 b / g / n
- Wi-Fi Direct (P2P), soft-AP
- Integrated TCP / IP protocol stack
- Integrated TR switch, balun, LNA, power amplifier and matching network
- Integrated PLLs, regulators, DCXO and power management units
- + 19.5dBm output power in 802.11b mode
- Power down leakage current of <10uA
- 1MB Flash Memory
- Integrated low power 32-bit CPU Could be used the application processor
- SDIO 1.1 / 2.0, SPI, UART STBC, 1 × 1 MIMO, MIMO 2 × 1
- A-MPDU & A-MSDU aggregation & 0.4ms guard interval
- Wake up and transmit packets in <2ms
- Standby power consumption of <1.0mW (DTIM3)
We'll cover AT Command test through arduino in our upcoming posts.
AT Commands
Applications:
ESP8266 can be used as an external Wifi module, using the standard AT Command set Firmware by connecting it to any microcontroller using the serial UART, or directly serve as a Wifi-enabled micro controller, by programming a new firmware using the provided SDK.
The GPIO pins allow Analog and Digital IO, plus PWM, SPI, I2C, etc.
This board has been used mostly in IoT contexts, where we want to add connectivity for example to an Arduino project. A wide adoption has been facilitated by the very modest price, ranging from 2.50 to 10 USD depending on the features offered by the manufacturers.
Some example projects:
- Temperature logging and Web UI
- Retro Web Browser
- Let's tweet with ESP 8266
Hope you enjoyed this post, stay tuned for tutorials on ESP8266 which includes
- Basic command test
- Firmware flashing with Arduino
- Temperature logger etc.
Meanwhile you can take a look at my arduino projects videos at EmB DeS SoL's Channel
No comments:
Post a Comment